/
/ 


Many amateur astronomers are drawn to capture images of the night sky through their telescope and camera. Astrophotography, also referred to as astro-imaging (for you savvy folks), is both an art and a science. What you see in an astrophoto is real. However, it will not look the same as when looking through a telescope visually. Given some practice and patience, you can take beautiful celestial images not unlike the ones displayed in posters and magazines. Astrophotography has progressed greatly over the last few years, especially with the rise of digital camera technology. While astrophotography is both challenging and rewarding, modern low-cost equipment brings this exciting hobby within reach for any enthusiastic amateur astronomer.
The Simple Approach
You can start snapping photos with nothing more than a "point and shoot" digital camera, such as a Canon PowerShot or Nikon CoolPix. With a modest telescope, it's possible to start taking impressive photos of the solar system objects which include the Sun (with a solar filter), Moon, Jupiter and Saturn. We'll briefly cover some simple ways you can start taking astrophotos with any camera setup you might have.
Shoot the Moon
Any telescope and camera setup will allow you to take quality astro-images of the Moon. Because the Moon is so bright, it does not require a long exposure and can be imaged without the use of an equatorial mount equipped with a tracking motor. The exposure is only a small fraction of a second, almost the same as a daytime photo. All you're basically doing is holding the camera in front of the telescope's eyepiece to snap a shot of the Moon. The telescope and tripod are setup as they normally would be for visual use. If you are using a "point and shoot" digital camera, you can easily couple it to the telescope's eyepiece using the Orion SteadyPix Deluxe Camera Mount.
Star Trails
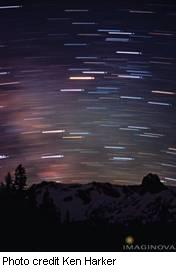 Star trails are a fun kind of time lapse photography that can be performed under any decent dark sky. Using a SLR (Single Lens Reflex) camera and an ordinary camera tripod, you can point the camera at the sky and open the shutter for several minutes. As long as the camera does not move during the exposure, you will capture the apparent movement of the stars in the sky during the exposure. Pointing the camera near the celestial pole will reveal steep concentric arcs. The further away from the pole you point the camera, the straighter the arcs become.
Piggyback Photography - Make your Telescope and Mount Hold your Camera
Beginners in astro-imaging can start taking quality wide field photos by "piggybacking" a camera to their telescope and mount. You will need a telescope equipped with a equatorial mount (EQ) which has a motor to compensate for the apparent movement of the sky (which of course, is really just Earth's rotation), and an SLR or DSLR (film or digital single lens reflex) camera capable of manual shutter control.
Piggyback astrophotography is a great way to start taking deep sky astrophotos without an elaborate setup. Instead of photographing through the telescope, you're placing the camera on top of the telescope. The camera telephoto lens is being used completely independent of the telescope. The point of placing the camera on top of the telescope is really just to take advantage of the heavy-duty equatorial mount which offers stable tracking. Many telescopes, such as Orion refractors and reflectors have tube rings with a camera attachment bolt on the top, ready for your SLR/DSLR camera. Some EQ mounts offer a 1/4"-20 adapter to fit directly to the top of the mount, allowing you to bypass the telescope and use the EQ mount directly. The camera telephoto lens has significantly less power than the telescope, which makes it far easier to track accurately; any errors or drift in tracking will not show up as much with a small camera lens. This is one of the reasons why piggyback photography can easily achieve good results. Milky Way panoramas, comets, meteor showers, and night landscape silhouettes are just a few of many fun things you can try with piggyback astrophotography.
The exposure time can be anywhere from a few seconds to several minutes. The shorter the f-stop on the camera lens, the shorter the exposure can be. But with any type of photography the required exposure ranges greatly. Bracket your exposures by starting with an educated guess, say 3 minutes, then experiment with shorter and longer exposures to determine what exposure time works best for your purpose. It is helpful to record your settings in a photo log.
Solar System Imaging
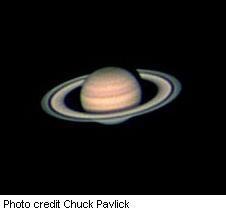
While the Moon can be photographed through just about any telescope and camera, the planets need more magnification because their apparent size is so much smaller. The full Moon is half a degree in the sky (about half the size of your pinky at arms length), while the largest planet in our Solar System, Jupiter, is about 2.5% the size of the Moon as seen from Earth. Telescopes with a long focal length and focal ratio work well when imaging the planets. The planets are bright, but because they require so much magnification to see well, the image will appear much darker, just like using a high power eyepiece. It's a common practice to use a 2x or 3x (or higher) Barlow lens to further boost the power on the planets to photograph them. But like visual astronomy, too much power will significantly degrade the quality of your image.
You will need an equatorial (EQ) mount equipped with a motor drive that compensates for the rotation of the Earth. It's also possible to use a simple altitude-azimuth mount with tracking ability, like some computerized "Go-to" systems. Exposure times will vary greatly, but is usually anywhere from a fraction of a second, to 1-3 seconds.
Stack Your Images
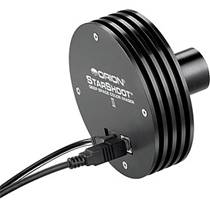
One of the biggest breakthroughs in digital image processing for astrophotography has been the method of stacking and combining the images to yield extraordinary detail of the Moon and planets. The same method is used for deep sky astrophotos as well. One high power digital image of Jupiter may not look impressive. However, by taking 50, 100 or even 500 fast exposure images of Jupiter, computer software (such as MaxIm DL, MaxIm DL Essentials included with Orion StarShoot cameras, or Registax ) will sum all the good detail, and remove the bad detail. The bad detail which stacking eliminates includes camera noise and lapses of time when the image may have been blurry due to atmospheric turbulence. The powerful effectiveness of digitally stacking several images allows ordinary digital cameras and web cameras to achieve amazing results of the Moon and planets. Modified webcams and planetary imagers, such as the Orion StarShoot Solar System Color Imager IV, work very well for capturing Solar System objects.
Deep Space Imaging
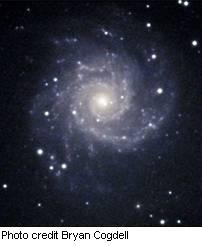 The "deepest" form of astro-imaging is of faint, deep space objects. These objects consist of nebulae, galaxies, and star clusters. Compared to solar system objects, deep space objects are extremely faint and require special CCD or digital SLR cameras. Many of these objects, especially galaxies, are invisible to the unaided eye and require a large telescope to see visually. However, unlike visual astronomy, photographing a faint object is possible with a smaller telescope. Telescopes with a short or "fast" focal ratio (just like a camera f-stop) are favorable for deep space imaging. It is critical to have a high-quality EQ mount with a motor drive that will track very accurately. Instead of opening the shutter for a few seconds or less, deep space objects usually require several minutes of exposure to capture the light needed.
A CCD camera replaces the eyepiece and plugs directly into the telescope's eyepiece holder. An SLR or DSLR can also replace the eyepiece, but they require a T-ring (specific to the make and model of your camera) and a universal T-adapter. This method of attaching the camera directly to the telescope without an eyepiece is known as prime focus astrophotography. This is the most effective way to capture deep space objects because you utilize the telescope's full light-collecting capability. Focal reducers, also called telecompressors, are available for some telescopes. These increase the field of view and decrease the focal ratio to provide a brighter image.
One of the biggest challenges of deep space astro-imaging is tracking. The telescope must move seamlessly with the apparent motion of the sky. Any drift or tracking error will create an oblong star in your image, or worse. All EQ mounts, even very expensive ones, don't track perfectly enough to produce a perfectly pinpoint star (also read about "polar alignment" in our Learning Center). When taking a long time-lapse exposure, the tracking will need to be corrected during the length of that exposure. This is known as guiding. Guiding involves monitoring a star through a separate guide scope and making tracking corrections as needed to prevent the star from drifting. This can be done visually with a crosshair (reticle) eyepiece, or with the use of a CCD autoguider. An autoguider is simply another camera that takes pictures of the star and sends corrections to your EQ mount. The guide scope is typically mounted on top of, or beside, the main imaging telescope. Most guide scopes are small, high-powered refractors because they don't add much weight to the setup and do offer the image detail needed to see the star drift.
CCD Cameras
 The ultimate camera for any type of astrophotography is the CCD camera. While CCDs are most commonly used for deep space imaging, they can also be used for solar system imaging. But you really take full advantage of a CCD when you go deep! The high sensitivity of a CCD camera allows you to take excellent images of distant galaxies and nebulas. High quality CCD cameras are equipped with a thermo-electric cooler which reduces much of the inherent noise from the camera. In general, CCD cameras have a higher cost compared to digital SLRs and also require the use of a laptop computer.
Digital SLR (DSLR) Cameras
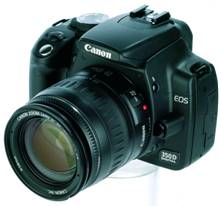 DSLR cameras are favored for their versatility because they work well for deep sky astrophotography and can still be used as an ordinary daytime camera. DSLRs offer a large imaging sensor usually about 60% of the size of a traditional 35mm camera (some newer models are offering a full 35mm format). DSLRs do not require using a laptop computer, but using an external computer is still beneficial to better control the camera. DSLRs have impressive capabilities, but they are also effected by noise and do not have the cooling capability of CCD cameras. As a result, longer exposures deliver more noise in the image.
Give It a Shot!
Becoming proficient in astrophotography is a challenging avenue, but it's also very rewarding. You can share your images with friends, family, and with the online community. As you continue to take better pictures, you may find that you were "bitten by the bug" and acquire more astro-imaging equipment. The sky is truly the limit for astrophotography.